Using OIDC Web as a Second Factor (Workforce MFA)
iProov Workforce MFA is the flagship OIDC Web deployment. The product uses OIDC Web as the second factor in multi-factor authentication (MFA). Your system has already authenticated the user with a first factor, such as a password, single sign-on (SSO) session, or passkey. Before granting access, you want proof that the live person is the account owner.
The recipe is the hosted-profile mode (see login_hint Mode 2) with your identifier:
- Authenticate the user with your first factor as usual.
- Start an OIDC Web login with
scope=openid faceauth_dynamic_onlyandlogin_hint=<your stable identifier for this user>, over JAR/PAR (see JAR and PAR). - Expect the first verification to enroll the user's face against that identifier. Every later verification is a 1:1 face match. To avoid trust on first use, pre-create the profile (see User Management).
- Validate the response as always:
state, ID-token signature, andnonce. Then enforceacr: requireface_present:iproov:gpa(Dynamic) orface_present:iproov:la(Express) as your policy demands. Treat thelogin_hintecho in the claims as the binding to your user. Do not usesub, which is unique per session. - On failure, the redirect comes back with an OIDC error. Apply your own policy: offer a fresh attempt, fall back to another factor, or lock and alert.
The same recipe covers step-up authentication and account recovery. For step-up, run the verification again before a sensitive action, regardless of session age. For account recovery, let a user who lost their password prove they are still the same person.
Off-the-Shelf IAM Integration
OIDC Web plugs directly into IAM platforms: Microsoft Entra ID (as an External Authentication Method), OneLogin, and Ping. In these setups, the IAM platform initiates the OIDC request itself. The platform passes along the signed identity context of the already-logged-in user. OIDC Web derives the profile identifier from the user's email in that context, so you need no login_hint plumbing.
In every platform below you supply the same details from your iPortal OIDC application (see Registering): the discovery endpoint, the individual OIDC endpoints, your client_id and client secret, and one faceauth_*_only scope. Read the endpoints from discovery rather than hardcoding them:
authorization:  $BASE/oidc/v1/authorize
token:          $BASE/oidc/v1/token
userinfo:       $BASE/oidc/v1/userinfo
issuer:         $BASE/oidc/v1
discovery:      $BASE/oidc/v1/.well-known/openid-configuration
Microsoft Entra ID
Microsoft Entra ID (formerly Azure Active Directory) is Microsoft's cloud identity and access management service. Add OIDC Web as an External Authentication Method so a face verification becomes the second factor.
-
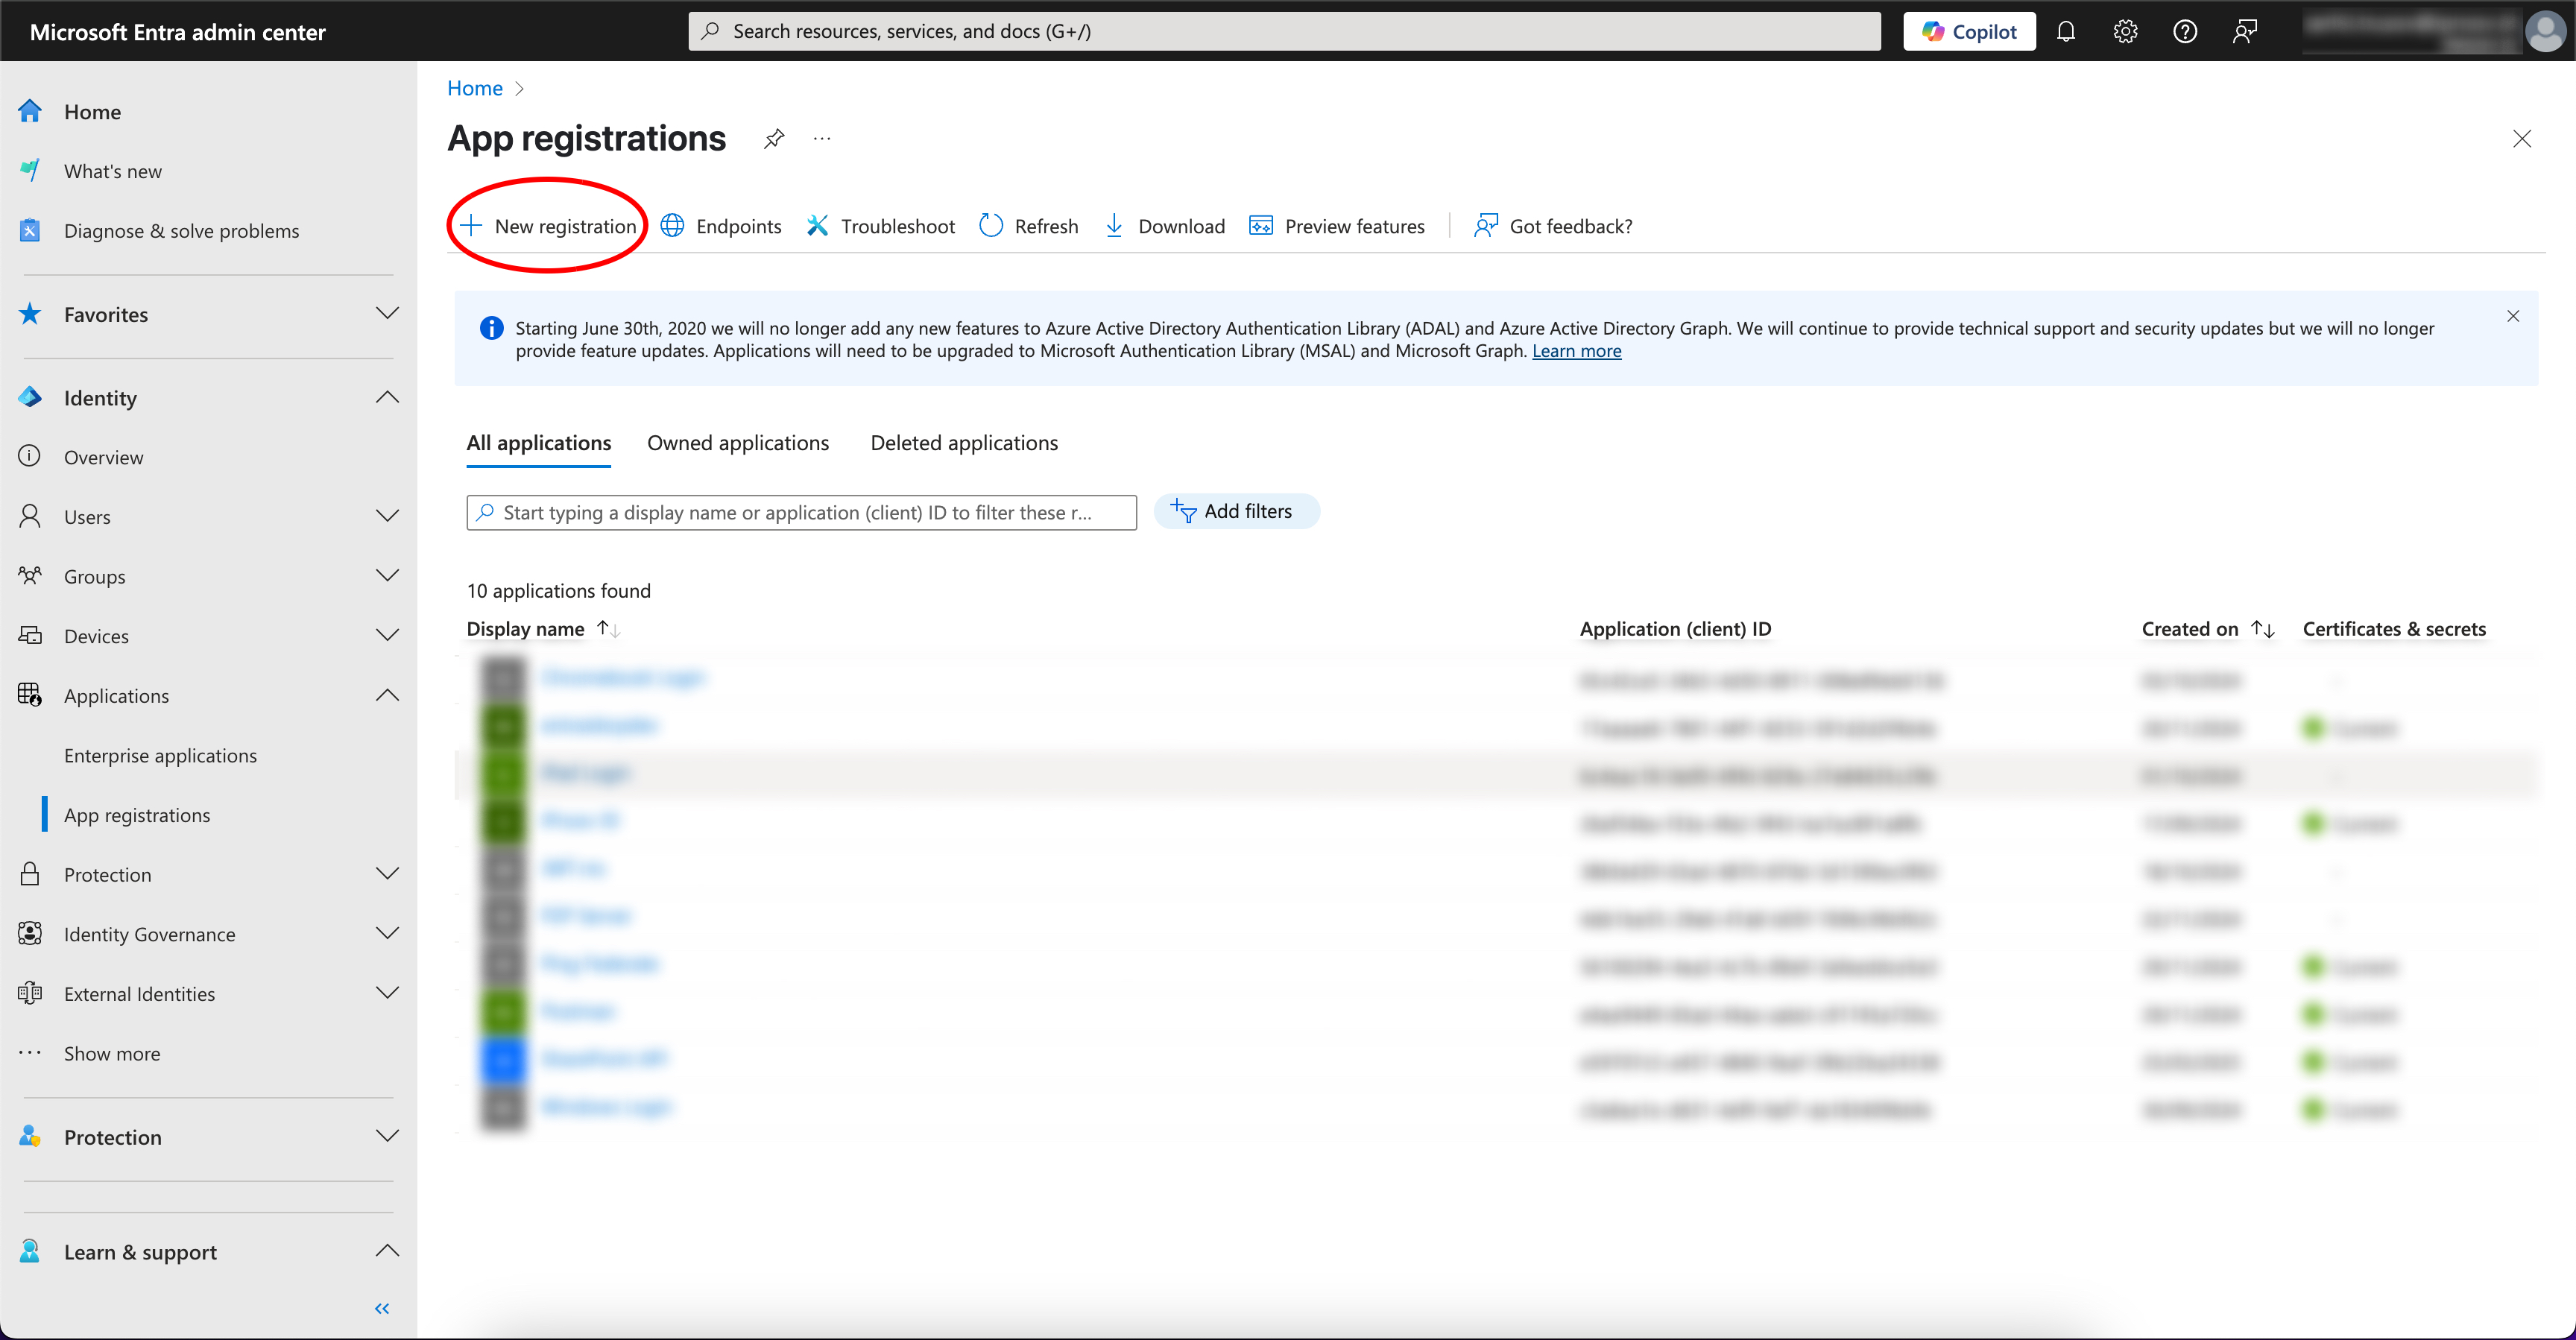
Register the application. In the Entra admin center, open Applications › App registrations and choose New registration.
-
Add the client secret. In your app registration, open Certificates & secrets and add the secret you obtained from your iPortal OIDC application.
-
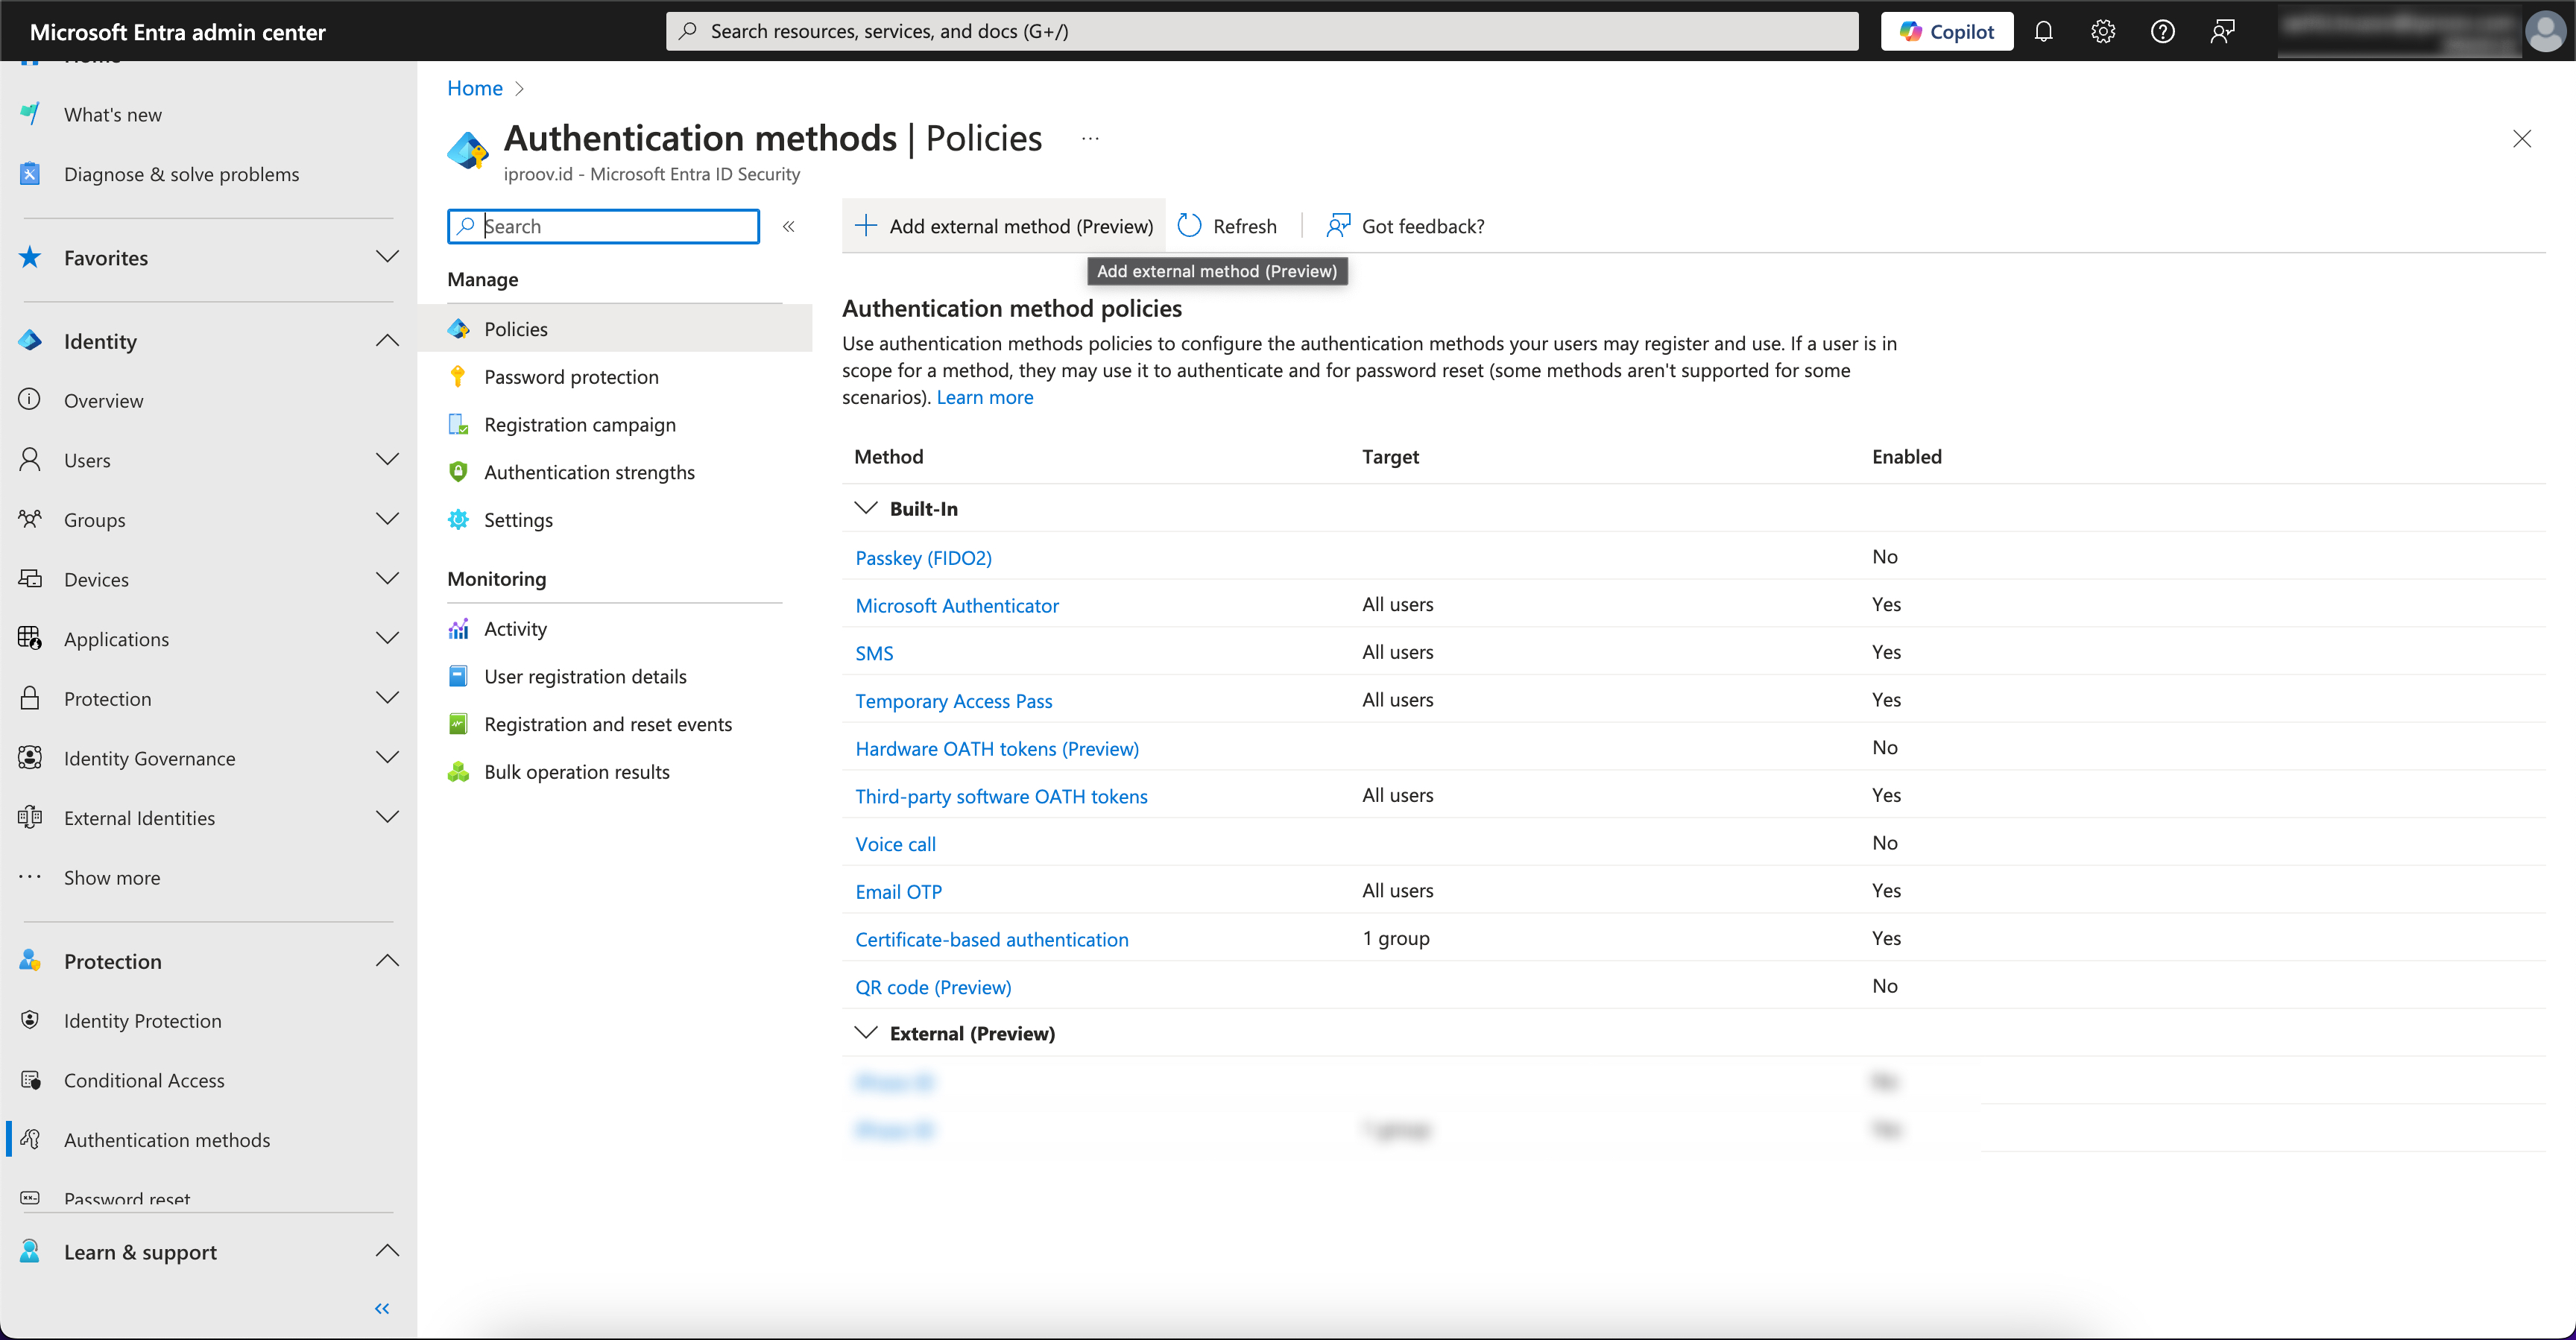
Add the external authentication method. Open Protection › Authentication methods and add a new external method. Fill in the name, the
client_idfrom your iPortal OIDC application, the discovery endpoint, and the application ID you created in step 1.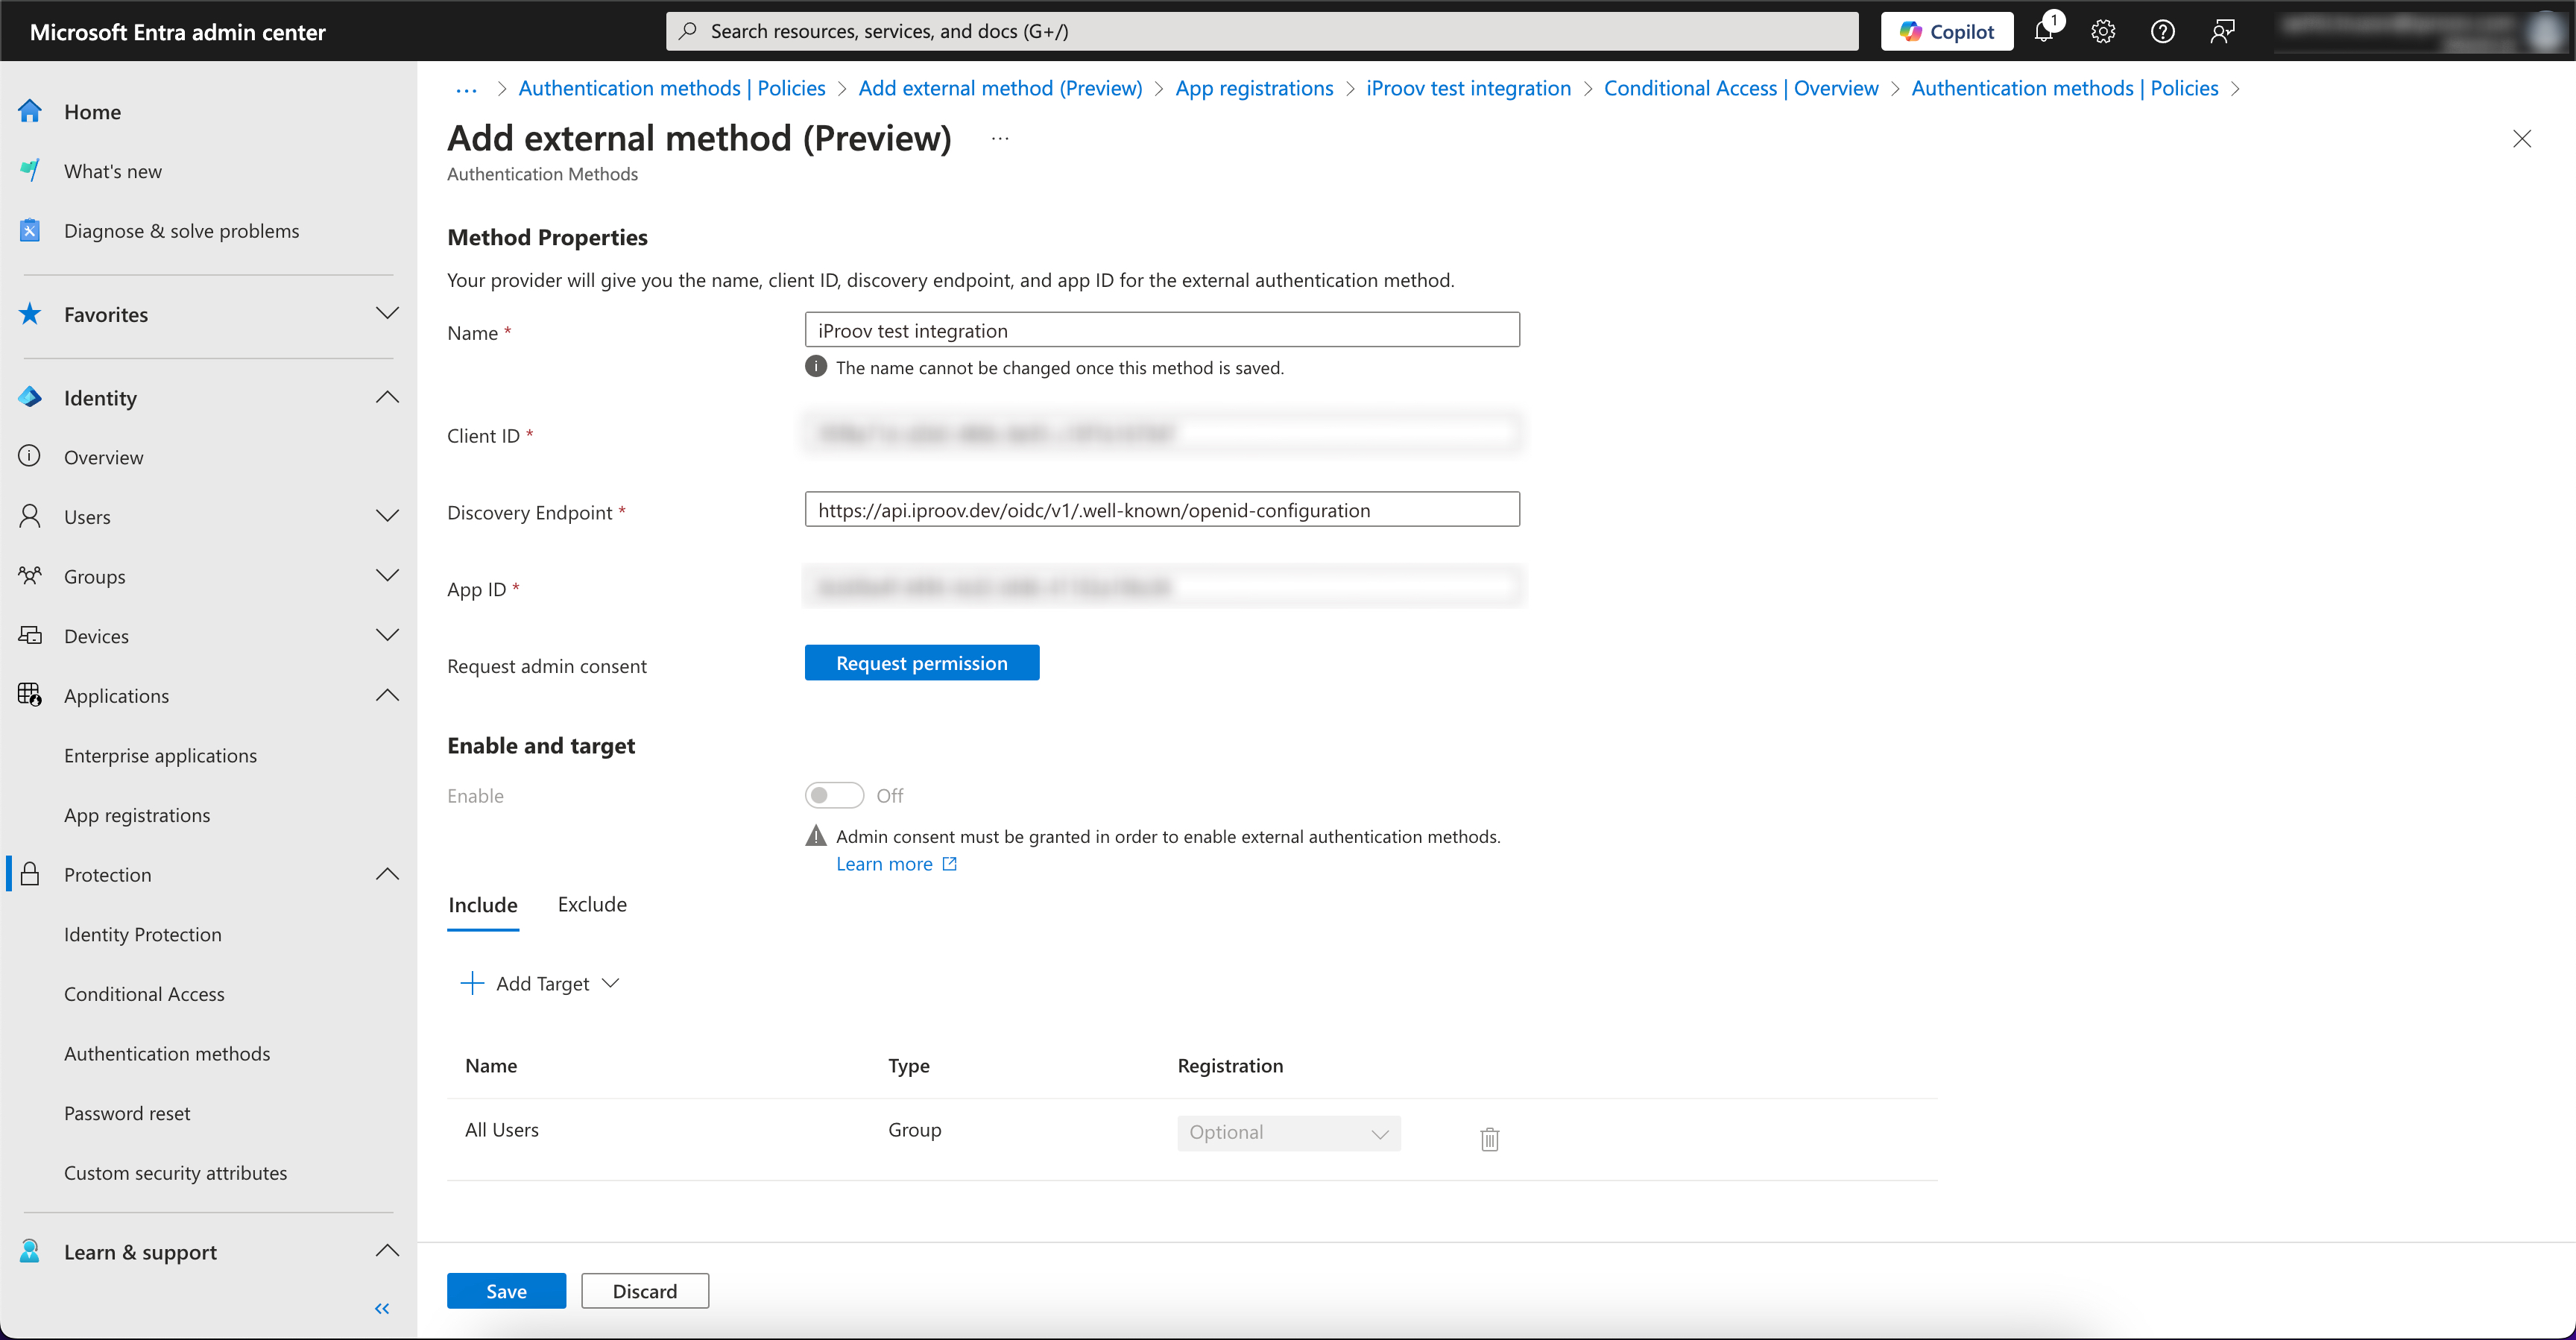
-
Target your users. Create a group containing the users you want to protect with iProov, then under Authentication methods › Policies open your new method, set the target group, and enable it.
OneLogin
OneLogin is a cloud identity and access management provider. The iProov OIDC connector lets you use iProov face biometrics as an MFA factor in OneLogin.
-
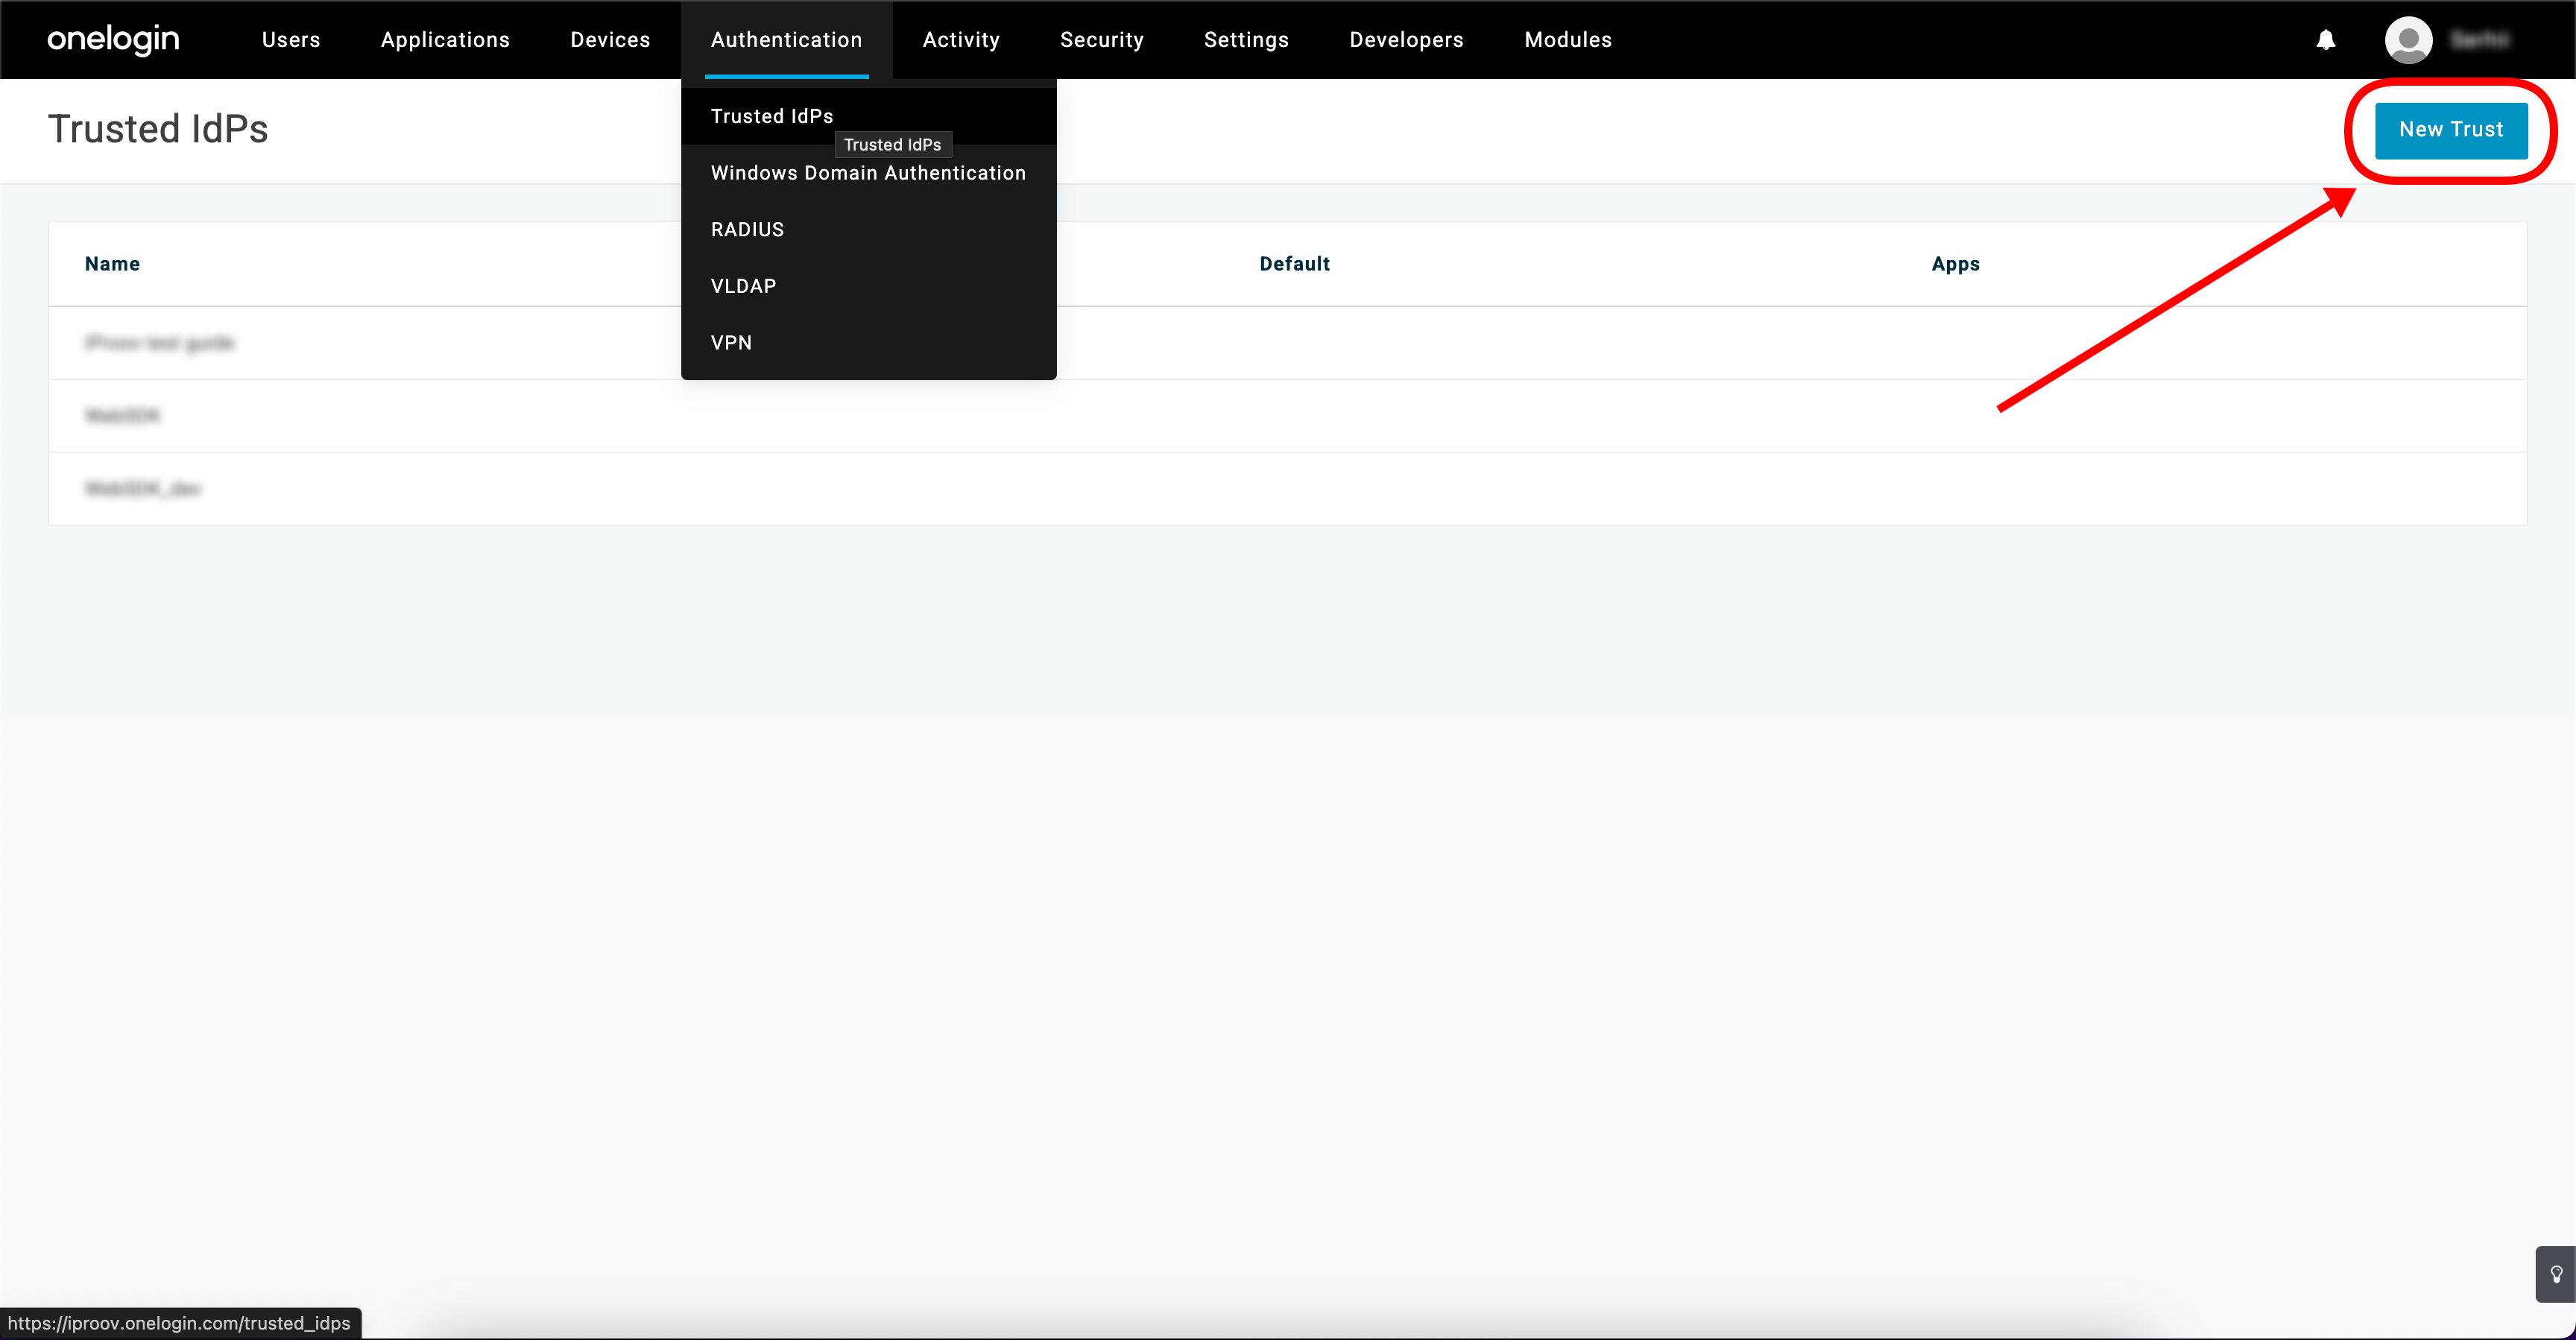
Create a trusted IdP. In the admin panel, go to Authentication › Trusted IdPs and click New Trust (top-right).
-
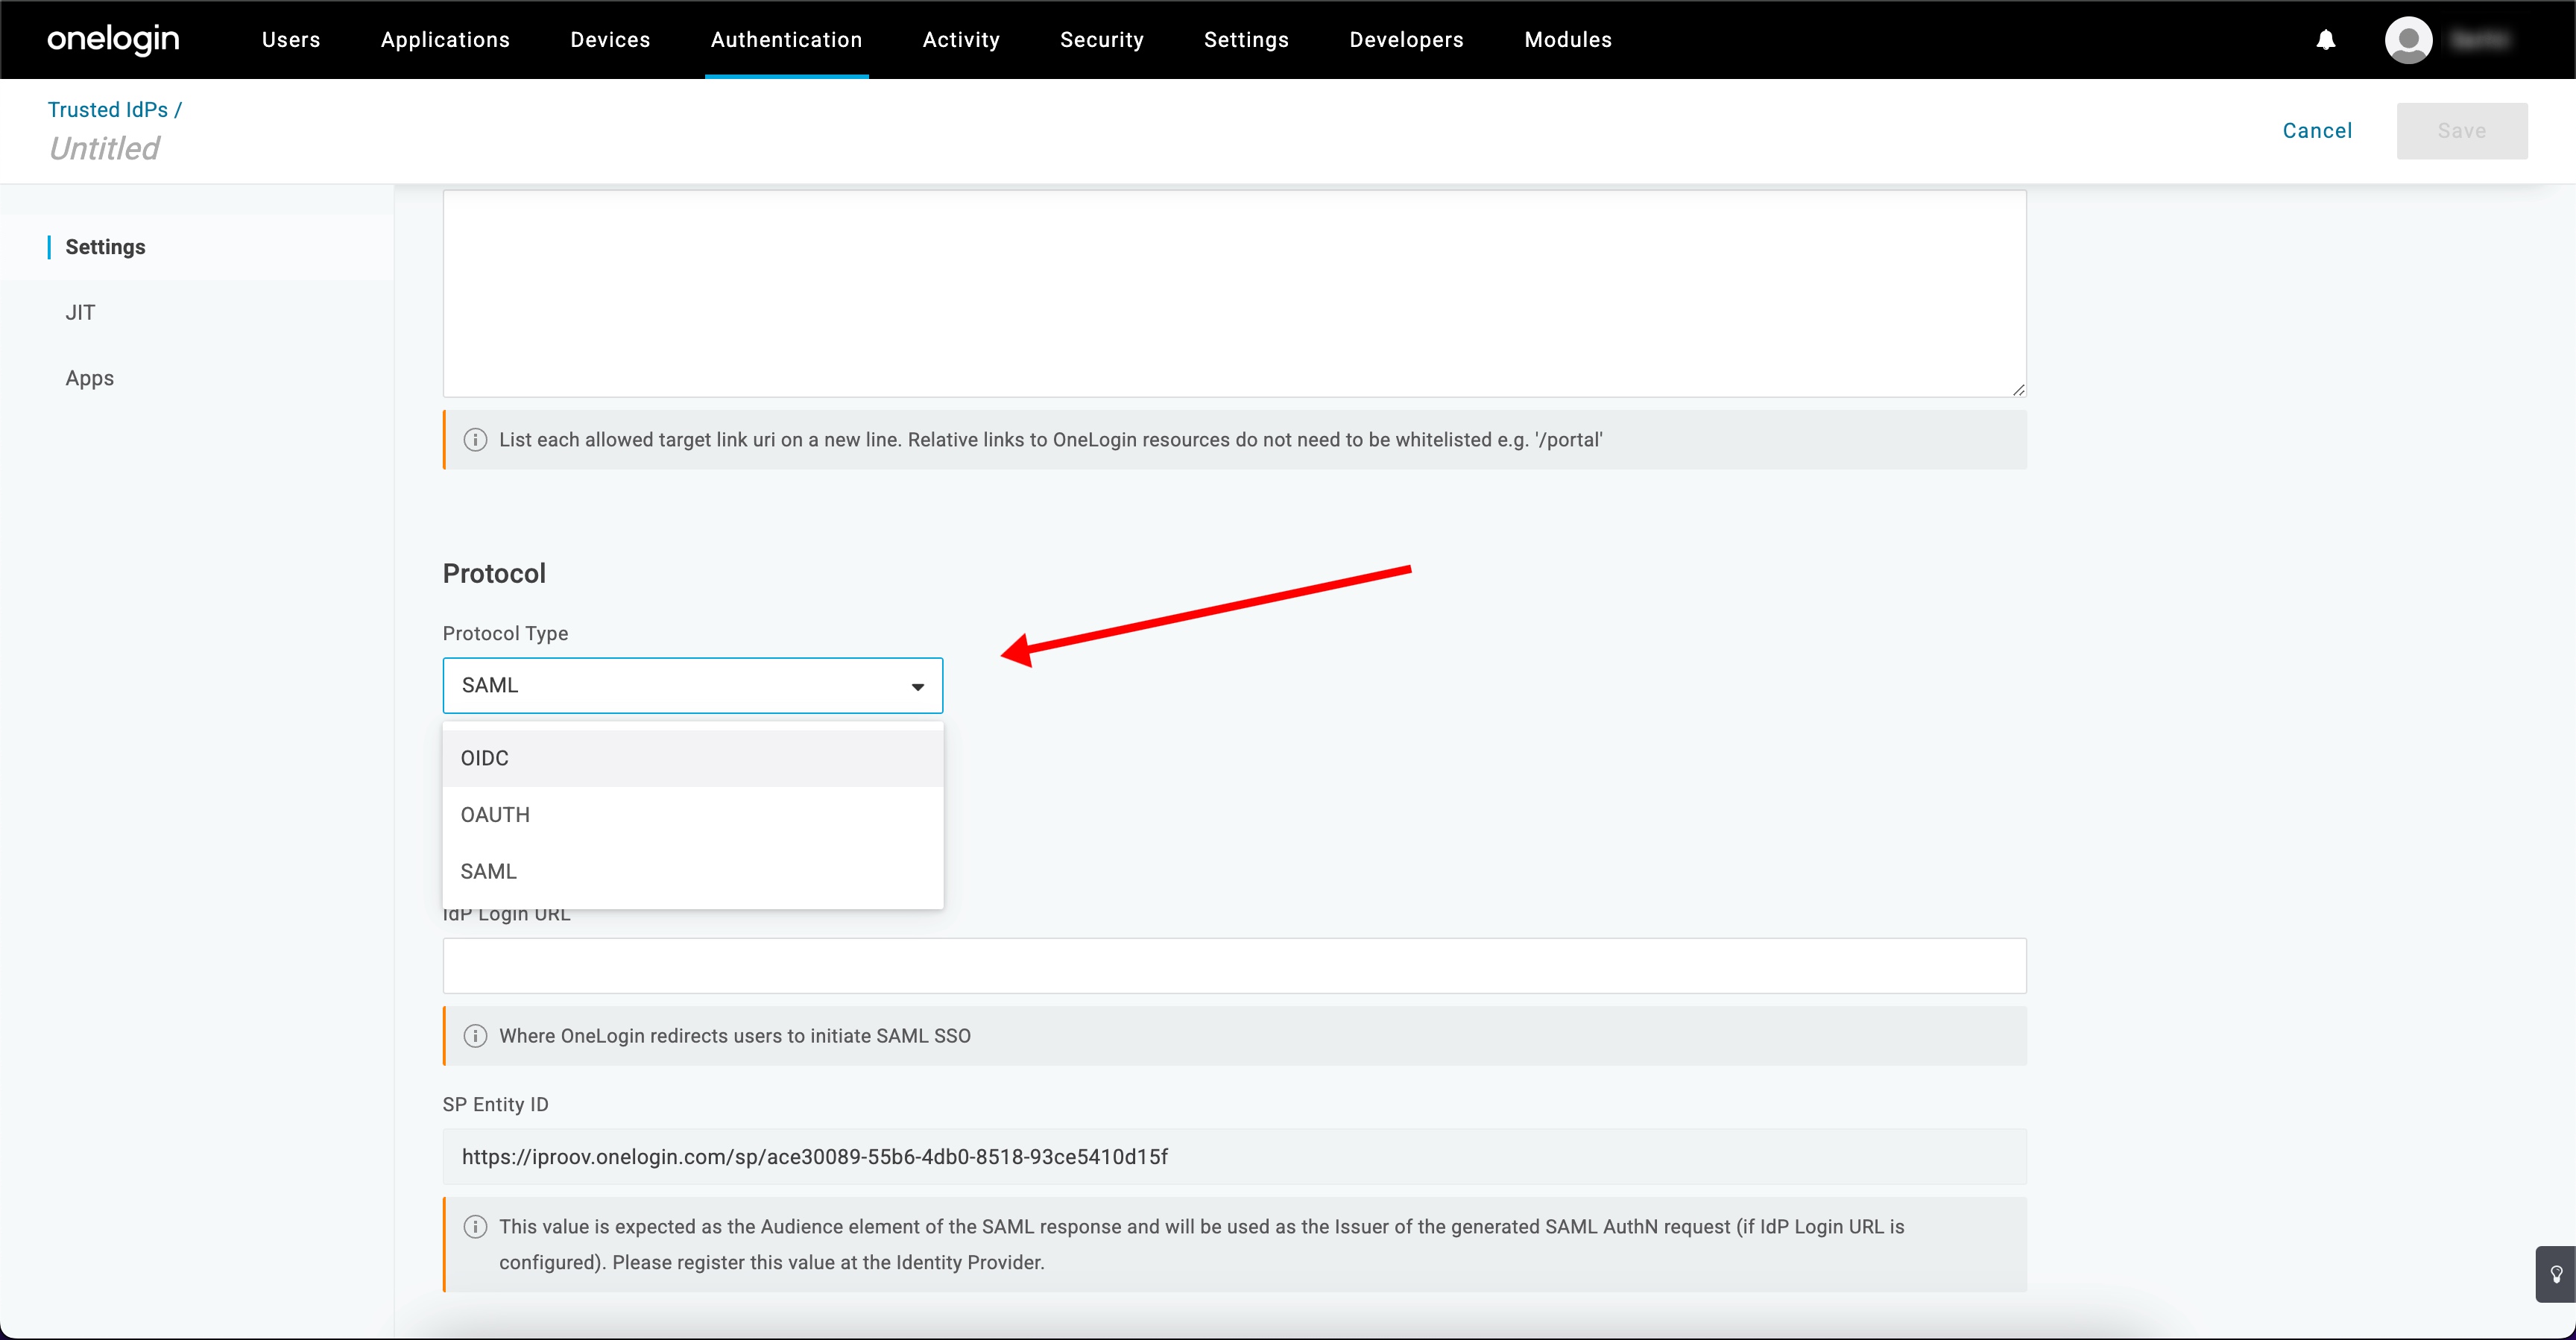
Name it and choose OIDC. Enter a name for the IdP, then at the bottom of the page select the OIDC protocol type.
-
Enable the IdP. Back at the top of the page, enable Trusted IdP and Show in Login panel. In Configuration, set the issuer to
$BASE/oidc/v1, then enable Sign users into OneLogin and Send Subject NameID (SAML TIDPs) or Login Hint (OIDC TIDPs) in Auth Request.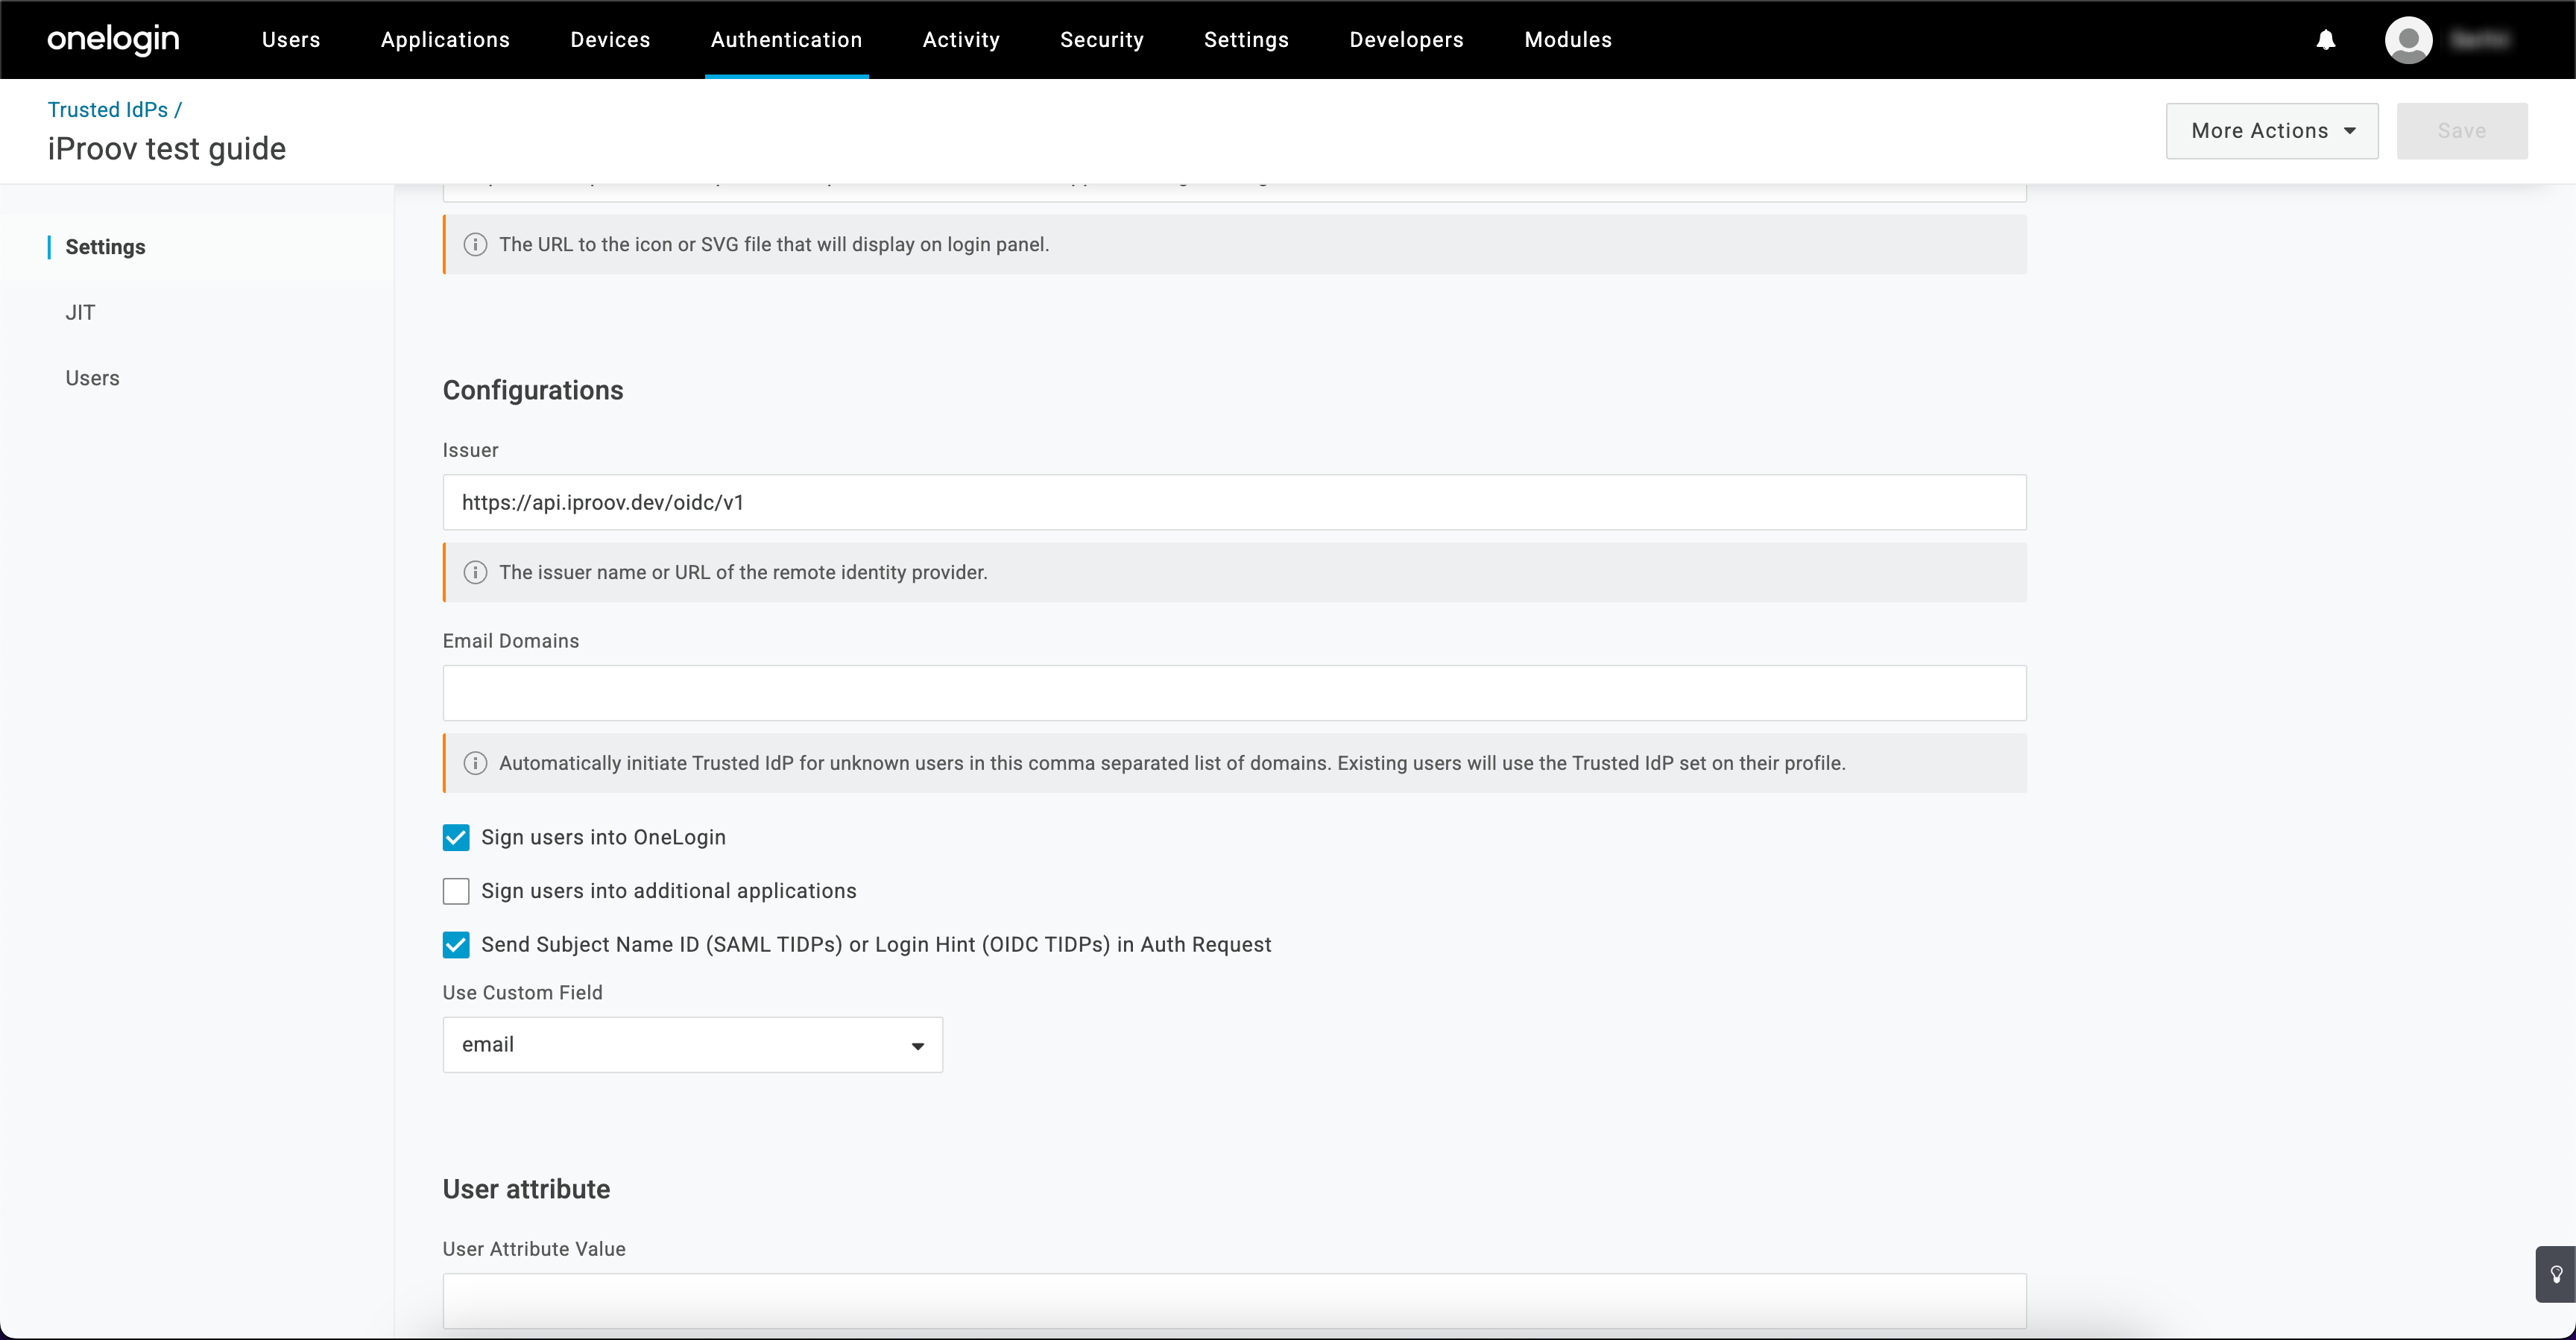
-
Configure the OIDC endpoints. Set the authorization endpoint to
$BASE/oidc/v1/authorize, the token endpoint to$BASE/oidc/v1/token, and the user-information endpoint to$BASE/oidc/v1/userinfo. Set the scopes toopenidplusfaceauth_express_only(Express Liveness) orfaceauth_dynamic_only(Dynamic Liveness). Finally, enter the Client ID and Client Secret from your iPortal OIDC application.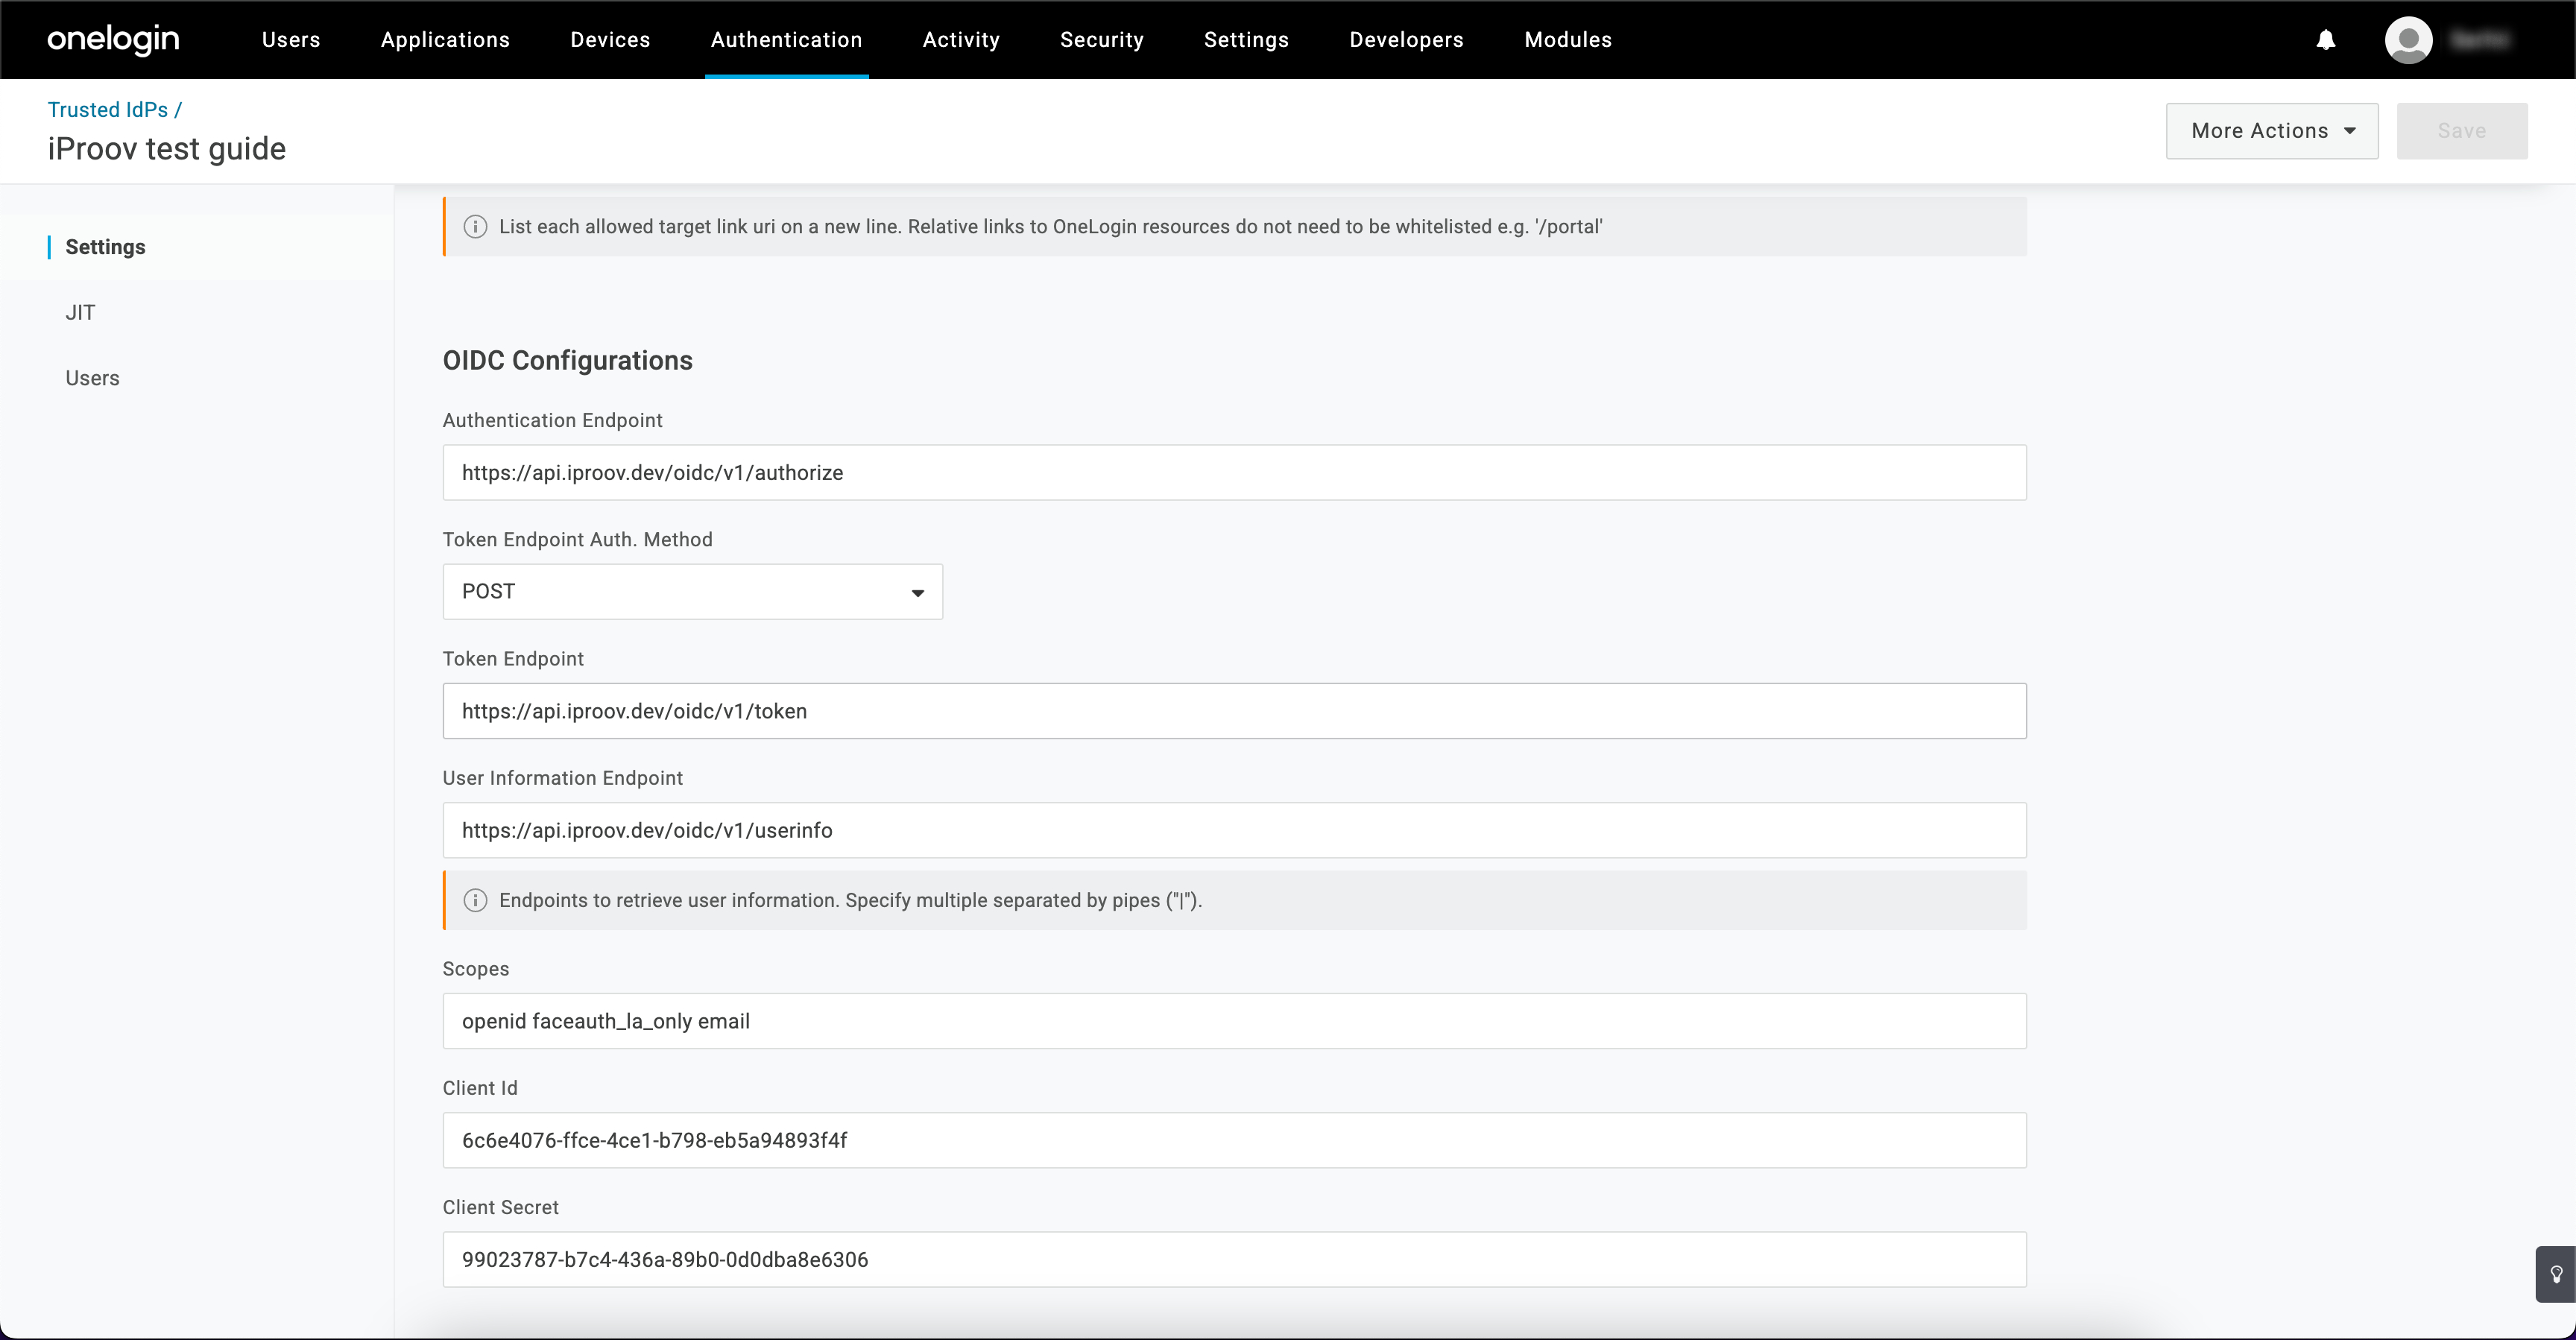
-
Register the redirect URI. In your iPortal OIDC application, add the OneLogin callback as a redirect URI. It looks like
https://<your-organization-domain>.onelogin.com/mfa/v1/idp/auth_callback. -
Enable iProov as an MFA factor. Go to Security › Policies, open your policy, and in the MFA section select your new IdP under OTP Auth Required.
PingOne DaVinci
PingOne DaVinci is a cloud orchestration service for building user journeys via a drag-and-drop interface. The iProov OIDC connector drops into a DaVinci flow and supports passwordless login, MFA, account recovery, step-up, and remote onboarding.
-
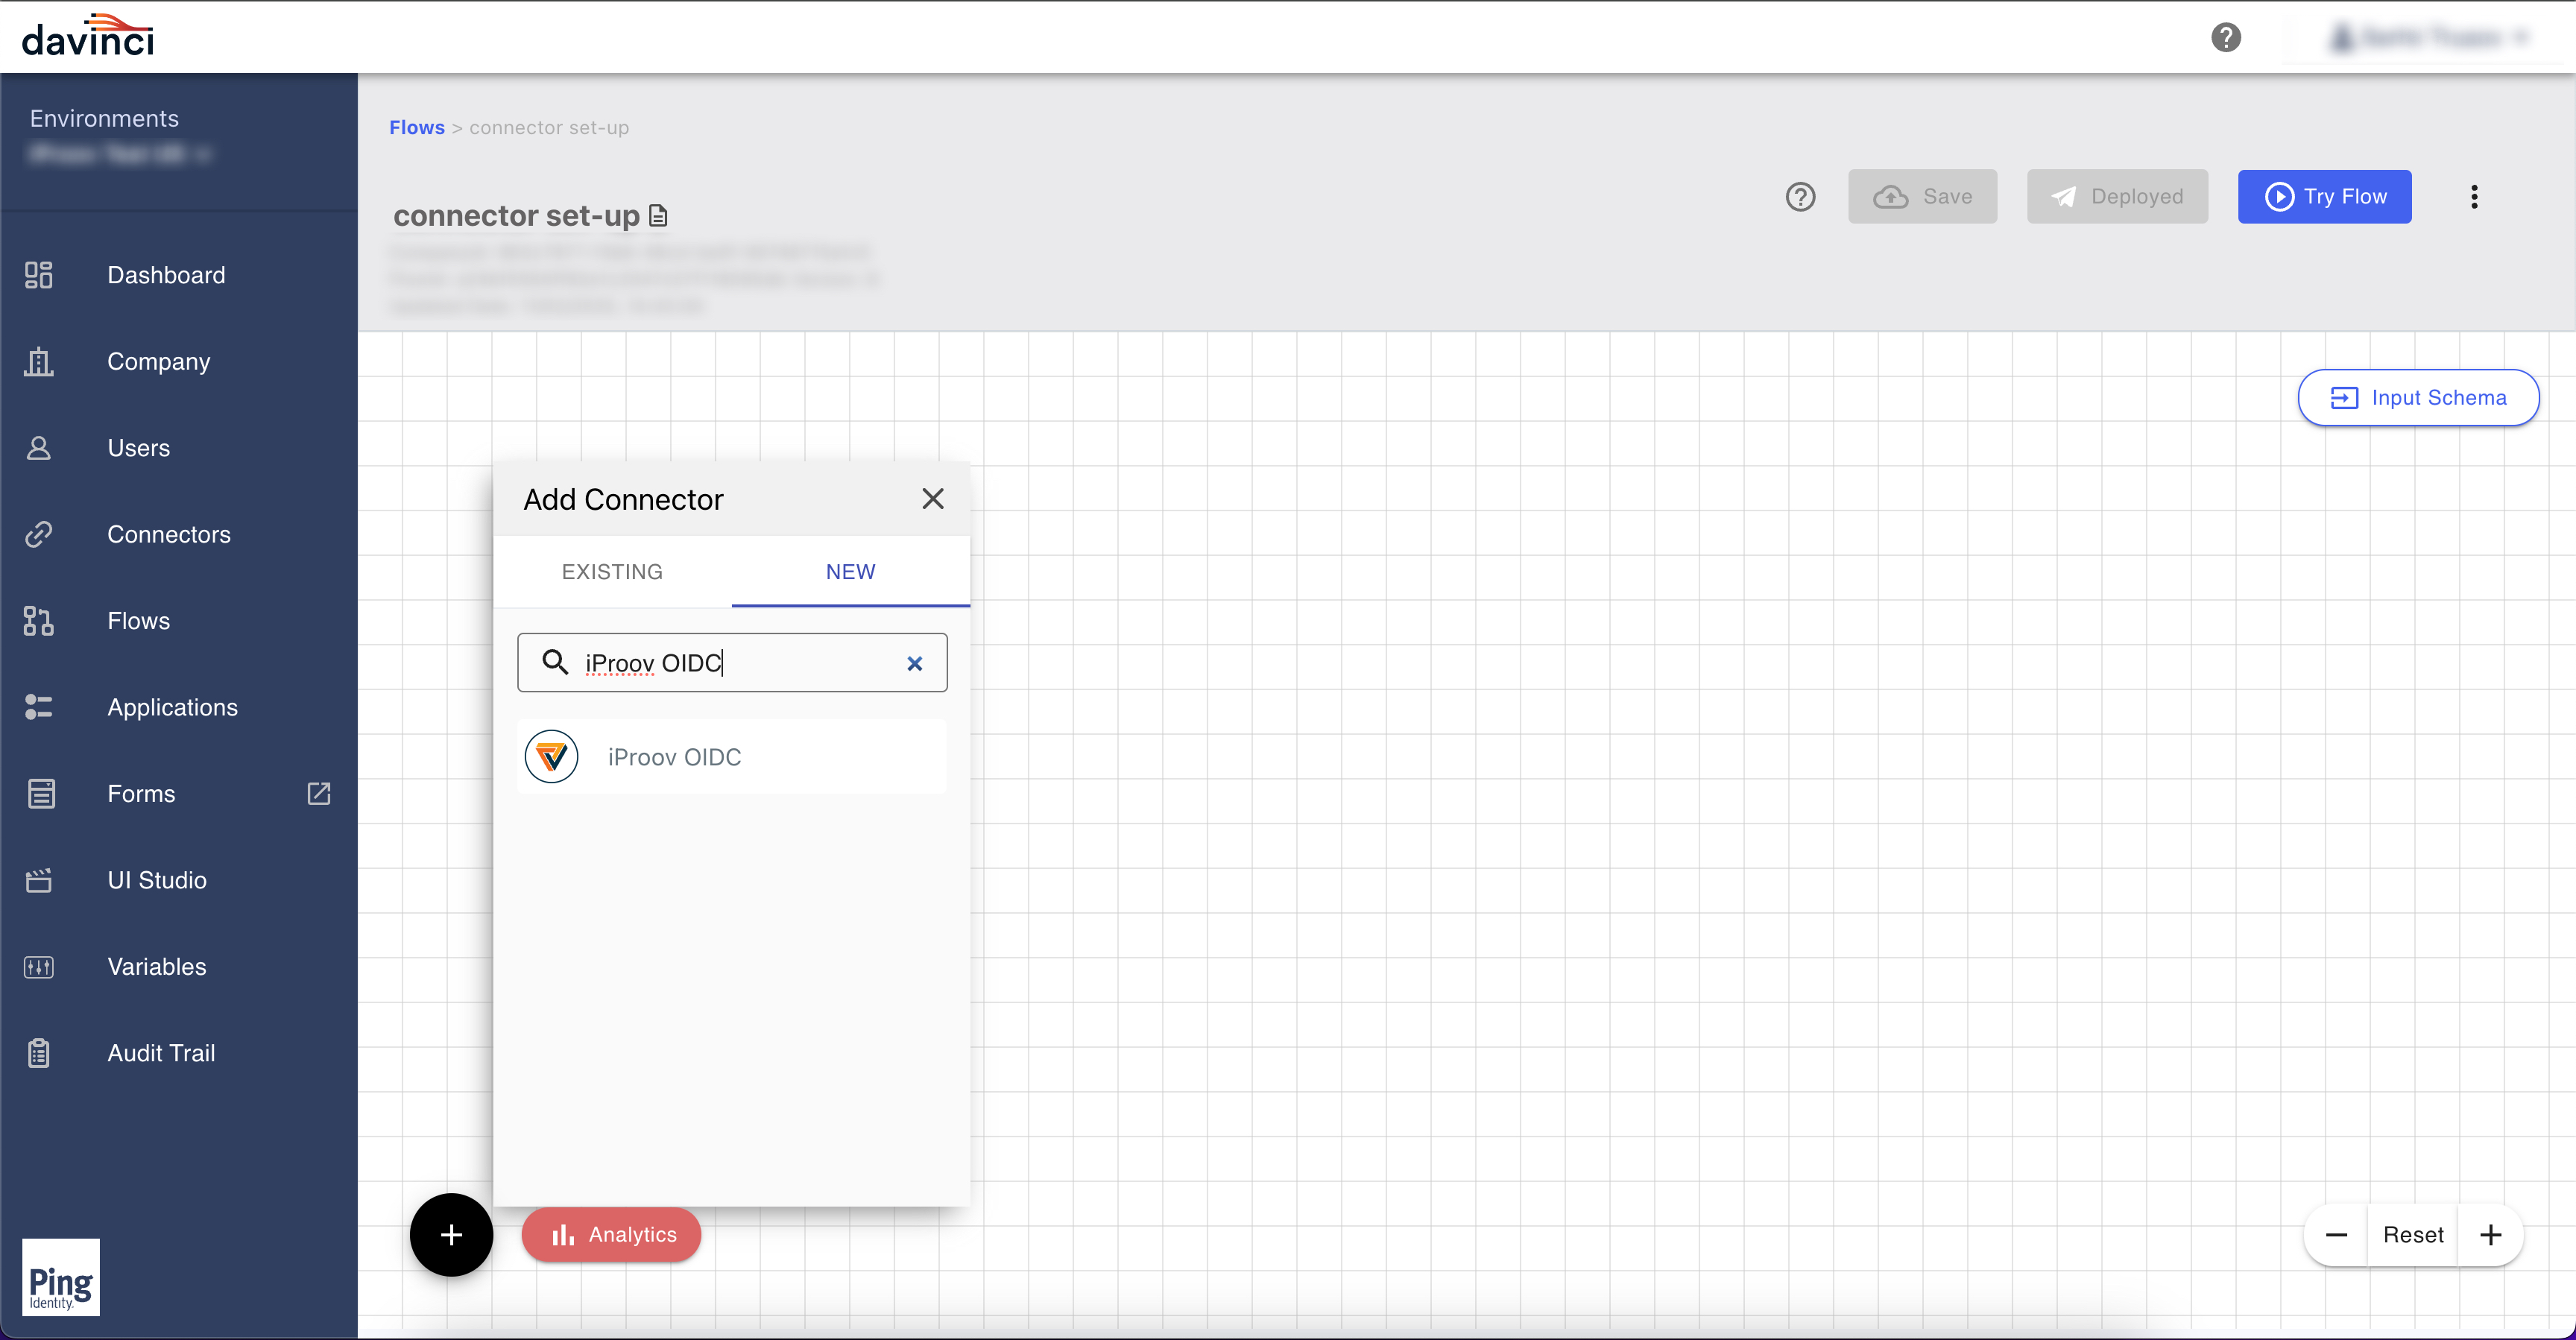
Add the connector. Create (or open) a flow in DaVinci. Add a new connector with the + button (bottom-left) and choose the iProov OIDC connector.
-
Configure the connector. Select the Redirect to iProov capability. In the connector settings, populate the endpoint fields from your OIDC discovery document and enter the Client ID and Client Secret from your iPortal OIDC application. In the Scope field add
faceauth_dynamic_only(Dynamic Liveness) orfaceauth_express_only(Express Liveness) according to your risk level.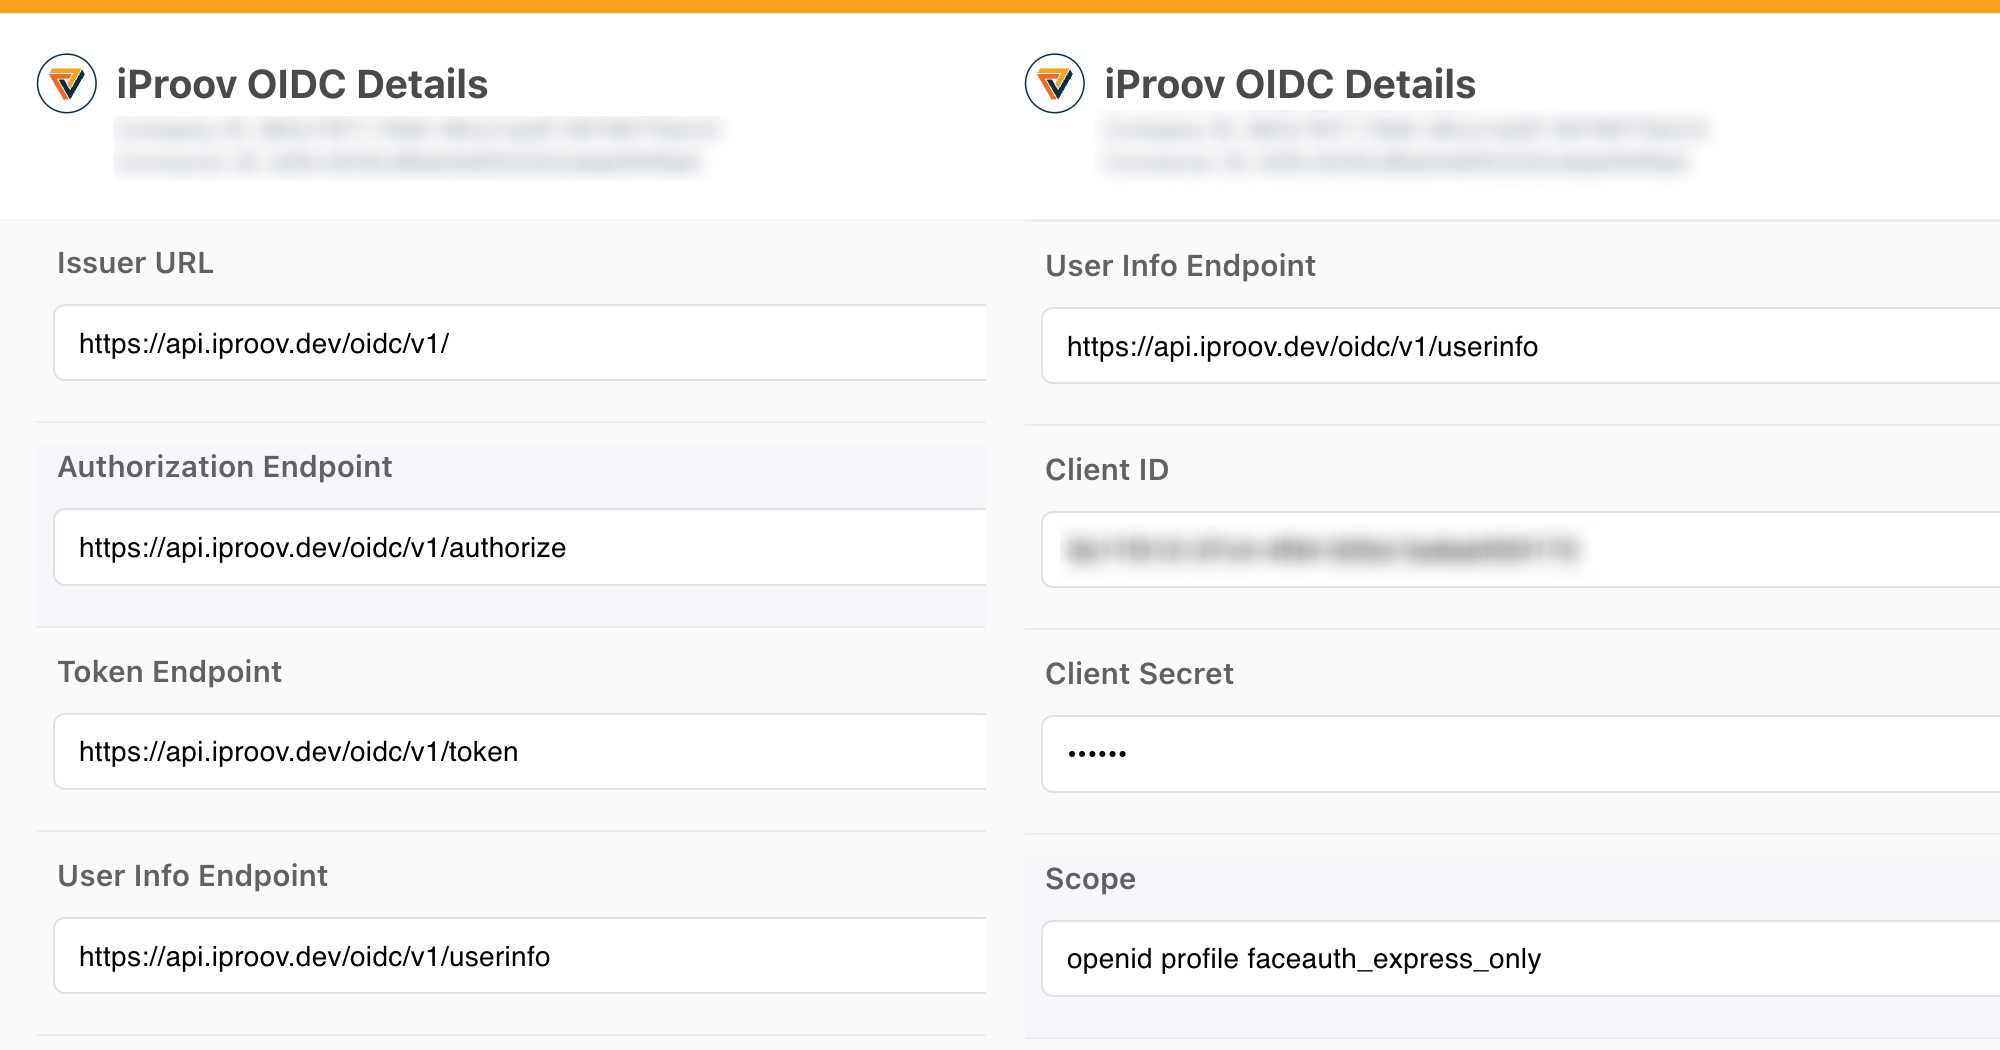
-
Register the redirect URL. In your iPortal OIDC application, add the redirect URL shown by your connector.
-
(Optional) Use a hosted biometric profile. To verify against a hosted profile (Mode 2), open Query Parameters and add
login_hintas a key with your stable per-user identifier as its value.
The connector ships with example flows for account recovery, MFA, and step-up authentication.