Photo enrol API
Photo enrol requires two sequential processes to enrol new users from trusted photo ID documents:
- enrol an existing trusted photo or an image captured from a document.
- Complete a face verification using iProov's Genuine Presence Assurance® (GPA) or Liveness Assurance™ (LA).
Implementation sequence
Photo enrol requires the following implementation sequence:
- Generate a photo enrol token.
- enrol the trusted image.
- Generate a verification token.
- Launch the client SDK with the token.
- Validate the token once the user journey has been completed.
- The generated
user_idmust be stored for validation, audit trail, and future verification. - iProov recommends storing tokens with user records to help investigate and troubleshoot problems.
Image requirements
Photo enrol has the following image requirements:
- Supported media types: PNG, JPEG, and JP2
- Max image size: 2 MB
- The image should conform to: ISO/IEC 19794 Information technology — Biometric data interchange formats — Part 5 Face image data
- Minimum distance between the eyes: 85 pixels
Image source options
| Capture type | Image source option | Description |
|---|---|---|
| Electronic ID | eid | The image is obtained from a Near-field communication (NFC) enabled document chip, for example, ICAO 9303 Machine Readable Travel Documents (MTRDs) such as passports. |
| Optical ID | oid | The image is obtained from an Optical Character Recognition (OCR) process that captures the photo present on government issued ID documents. |
| Face or liveness verification | selfie | An existing trusted image that you have for the user. |
Implement the API calls
Use this sequence of API calls to implement photo enrol:
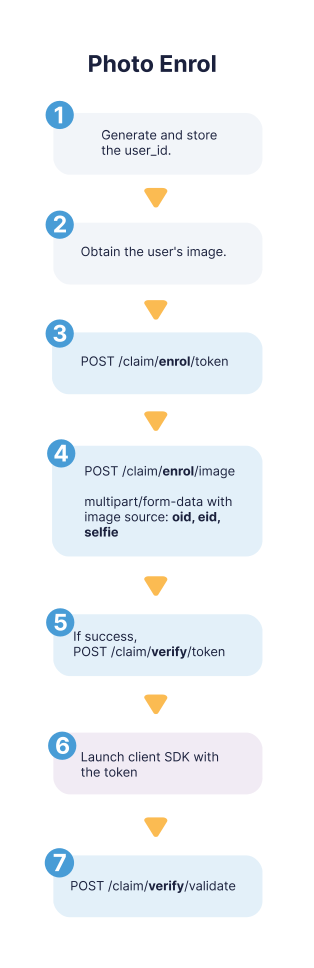
- Generate and store a
user_idthat conforms to this regex:[a-zA-Z0-9'\\+_@\\.-]{1,256} - Obtain a trusted photo of the user's cropped photo image from one of the following verified sources:
- OCR procedure
- NFC chip, for example, Data Group 2 in a passport.
- Existing trusted photo or face/liveness verification, see image requirements
- Generate a photo enrol token:
POST /claim/enrol/token - Enrol the trusted image:
POST /claim/enrol/image- Use the token from the previous step.
- Provide the image source option:
eid,oid,selfie
- Generate a verification token in response:
POST /claim/verify/token— theuser_idmust be the same as the one you generated in step 1. - Launch the client SDK using the token from the previous step. The user is guided through the journey using GPA or LA.
- Validate the token:
POST /claim/verify/validate- You will receive one of these GPA or LA outcomes and the failure reason where appropriate:
true,false - You must store the outcome with your user record. You cannot make subsequent calls to this endpoint with this
user_idandtokencombination.
- You will receive one of these GPA or LA outcomes and the failure reason where appropriate: